LinkSys Port Forwarding Configuration
The basic idea bedind configuring different makes of LinkSys Router remains same, though there might be some various in settigs among diffenet makes.
To make necessary changes you need to log into Admin section. To access admin open a web browser and access type address http://192.168.1.1. You will be prompted to enter user id and password to login, enter correct user id and password and press Enter to proceed.
Port Forwarding Configuration
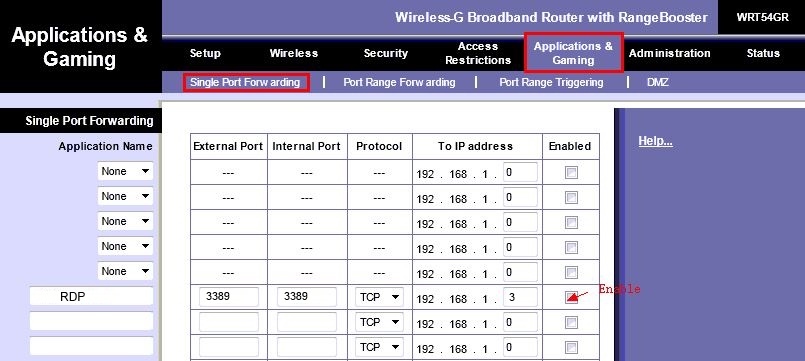
After logging into Admin panel, click the “Applications & Gaming” hyperlink from top navigation and then goto Single Port Forwarding menu. Here in the screen enter name of the application (similar to image) in out case RDP which is for Microsoft RDC connection. This entry is just a label and you can enter anything for your own reference. Enter the external and internal port to port of your choice, in our case it is 3389 which is used by RDP protocol.

Here you need to ensure that device for which you are forwarding the port is having sane internal ip which is displayed in the configuration screen. In our case internal IP address is 192.168.1.3. Click the "Enable" checkbox and finally save the configuration by clicking on "Save" button at the bottom of the screen. It is recomended to use static IP as time to time you device IP can change if it is using DHCP to connect to netwrok.
Test Port Forwarding
After you are done with router settings you need to find your external IP address so that it can be accessed remotely. To do so visit our main page at
Port Checker. A screen similar to beow will be displayed.

By default this page displayes your external IP Address. Now enter the port number you want to trace and click check button to test whether port forwarding have been set
or not.